
Having a personal website is very useful, for many reasons. However, building one is sometimes a bit difficult. Of course there’s WordPress, but it can feel a bit heavy, and too abstract for someone who likes to code. On the other hand, Web Development is not easy and can be time consuming.
Here I’ll describe how I went about making my personal website (this one) and how I deployed it on GitHub Pages. The whole process wasn’t as easy as I thought it would be (mainly because of the lack of tutorials), so hopefully this will help someone else down the line.
The assumptions I’ll make
- You are reasonnably familiar with the command line;
- You are reasonnably familiar with Git and GitHub;
- You are reasonnably familiar with the web languages HTML and CSS.
If you don’t feel comfortable enough with any of those topics there’s plenty of great tutorials out there. For example you can head over to codeacademy and then come back here.
What are we using to make our website
GitHub provides a very helpful and free service known as GitHub Pages. It offers users to host any static website for free. There’s plenty of different tools to create static websites. We’ll be using Hugo in this tutorial but the process is very similar with the other tools. You can find a list here. The proccess is a bit easier with Jekyll because it’s already integrated into GitHub Pages, but I didn’t find any theme I liked so here we are.
1. Getting the website up and running locally using Hugo
Install Hugo. On MacOS this can be done with
brew install hugoFor other OSs and other ways of installing Hugo see Hugo’s documentation.
You can verify your install with
hugo versionCreate a new site with
hugo new site <YOUR-WEBSITE-NAME>It’s that simple!
Move to the repository you’ve just created
cd <YOUR-WEBSITE-NAME>You can now download a theme you like. You can browse Hugo’s themes on this link. Once you’ve choosen a theme, do a git clone in the
themesdirectory. For example with the hyde-hyde theme used on this website it’s done viagit init git clone https://github.com/htr3n/hyde-hyde.git themes/hyde-hydeThen, add the name of the theme to the
config.tomlfile of the theme. You can directly edit the file with a text editor or enter in the CLI (for hyde-hyde)echo 'theme = "hyde-hyde"' >> config.tomlYou can now customize your website. To start a local server that rebuilds everytime you change the file of your website, use
hugo server -DThe
-Doption makes the drafts visible. To add new content you can simply typehugo new posts/<NAME-OF-YOUR-POST>
Once you’re happy with the website you’ve built locally, it’s time to deploy it on GitHub Pages!
2. Deploy the website on GitHub Pages
You’ll have to create two repositories: one for storing the Hugo files, and another for storing your actual website. Careful, the repository for storing your actual website must be of the format
<YOUR-GITHUB-USERNAME>.github.io. For example for me it’spouannes.github.ioAdd the github remote origin to your local repo containing the Hugo website and push your files. For example with
git remote add origin <GITHUB-REPO-URL>
git push -u origin master
You can then build the Hugo website simply by typing
hugoThis will create a
builddirectory which contains your website. You don’t want git to track that directory with the rest of the files here, so add it to.gitignore, for example withecho "build" >> .gitignoreHead to your public directory
cd publicAnd set your
<YOUR-GITHUB-USERNAME>.github.iorepo as the remotegit init git remote add origin <GITHUBUSERNAME.GITHUB.IO-REPO-URL> git push -u origin masterYou can then head to the settings of the
<YOUR-GITHUB-USERNAME>.github.iorepo and it should look something like this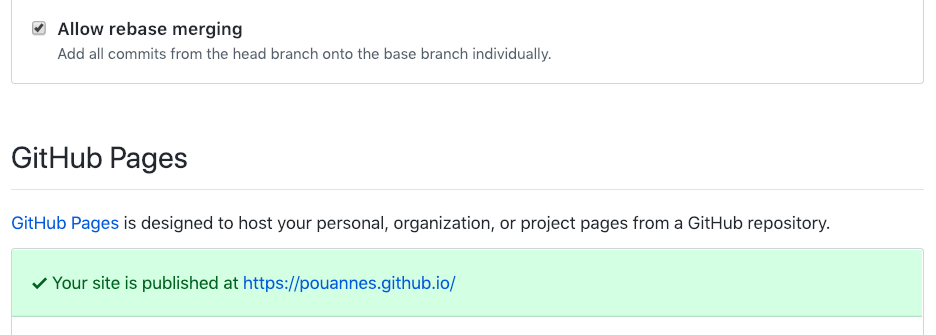
Congrats, GitHub Pages is now serving your website!
3. Automating future changes to your website
To recap, making local changes to your website involves testing the changes using hugo server -D, and then pushing the modifications to GitHub (from the root of the website).
Making changes to the public version of your site involves building the site with the command hugo, and then pushing the changes from the /public directory to GitHub Pages.
Here’s a little script to automatically do all that. The script also asks you for the commit message for both pushes.
#!/bin/bash
git add .
echo "Enter commit message: "
read commitMessage
git commit -m "$commitMessage"
git push
hugo
cd public
git add .
git commit -m "$commitMessage"
git push
Put that script in a file like build.sh in the root of your project. You can make it executable with
chmod +x build.sh
and then execute it with
./build
You can also execute it simply with
sh build.sh
Voilà, I hope it helped you. Feel to reach out on social media if you have any questions!